More Wreaths!

Hi!

Even though Christmas has come and gone, my wreath-making skills are still fired up! I gotta make some for next Christmas, obviously. Right now, I am trying to make enough wreaths to hang on almost every door in my house. Don’t ask me why, I just have to. LOL I have about 4 or 5 more to go.

Crazy Silver Wreath (1)

This silver wreath is a lot smaller than my other wreaths. The wreath base I used is about 12″ and I used a roll of 6″ silver mesh. I wanted to try a crazy color scheme since it looked like a lot of fun to do. When I started this, I didn’t have any of the ornaments that you see now. To reduce costs, I bought a bag of Christmas-themed decorative fillers for $1 (colorful styrofoam balls) and glued those to the mesh. I then got some ornaments with designs on them since it looked a little plain to me. I could only find a box of 9 ornaments with weird dots on them. Since I wanted more size variety, I bought a box of plain ornaments and used perfect pearls to add white dots to them. And voila!

Pink Wreath (4)

This pink wreath does not sit well with me. I really don’t know what I was thinking when I got pink ribbon (of almost the same shade!) to use with the pink mesh! That is the main thing that bothers me about it. When I went out shopping earlier for things to go with the pink mesh, my brain kept thinking “pink, pink, pink.” Shame on me for not focusing on my secondary color (which was gold). Anyway, after adding the gold and pink flowers and ornaments, I felt it needed more color variety; therefore, I added bits of lime green, silver, and purple/pink ornaments. Alas, despite this varied color scheme, it still feels too….pink!

Vintage RedGrn Wreath (7)

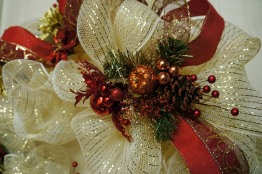
I had a difficult time decorating this wreath. I wanted to stay within the color scheme (red, green, brown, gold), but the Christmas stems I had were almost invisible against the mesh. My brother pointed that fact out to me, so I had to find something with contrast. Luckily, these gold Christmas stems I got at Michael’s work perfectly. A piece of advice, if you ever feel that your wreath looks too sparse or you can’t get a color to work with your other colors, try adding large flowers of the desired color and see how much more unified the entire composition becomes. Before I had the large, gold flowers, I had the small, gold Christmas stems arranged around the wreath and it just looked too awkward. It wasn’t until I added the large, gold flowers that I was able to make the other gold stems look like they belonged on the wreath.

I hope you got some inspiration/ideas from my wreaths to make your own mesh wreaths. Remember to not stress too much over having it look perfect. No one will notice the flaws after you add the embellishments and finalize everything.

Thanks for reading!

Hally


Frozen Mesh Wreath & Pumpkin

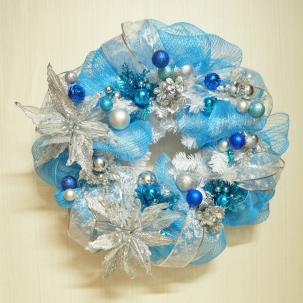
With all the “Frozen” hype going on for the past year, I had to make a wreath with that theme, or at the very least with that color scheme. I used a 24″ white pine wreath base (from Joann), one roll of 6″ Light-ish Blue mesh (from the 99 cent store!), a jumbo roll of 2″ Silver, wired ribbon (from Michael’s), blue and silver plastic ornaments of varying sizes (99 cent store and Joann), and various Christmas picks and stems (Michael’s). Click on images to enlarge.

 BlueDecoMeshWreathShotsBlueDecoMeshWreath (1) BlueDecoMeshWreathCloseUpShots

I LOVE the ribbon I used. It has beautiful snowflakes that are just beautiful. I was also lucky enough to find Silver Christmas stems that have petals with the same sheer quality as the ribbon. Score!

I found that the pine wreath was a bit more difficult for me to use than the metal frame with the pipe cleaners. Perhaps it is because it can get a bit confusing on locating the right place to attach the mesh. I had to redo it once, using a different method, since it look awkward the first time around.

Anyway, I hope this sparks some creativity in you to make your own wreath! You won’t regret it.

————————————————————————————

I also wanted to show you an Elsa pumpkin I finished a day or two ago. I found a tutorial on Pinterest by blogger apumpkinandaprincess and I just had to try it myself.

You’ll need:

  1. A plastic white pumpkin (usually sold at Michaels a month or two before October)
  2. Krylon glitter blast, “Sparkling Waters” color
  3. Krylon glitter sealer to help keep the glitter stay put (optional)
  4. Adhesive rhinestones of your choice
  5. Adhesive bling on a roll
  6. Snowflakes stickers
  7. Small tiara

This is how mine turned out. I had a lot of fun using the glitter blast spray and I plan to do more with them in future projects. I followed apumpkinandaprincess’ design up until the rhinestones. I couldn’t find the ones she used so I found ones that worked just as well and also a pack of snowflakes in two shades of blue that was just too pretty to pass up. The only thing left is to find a tiara, which I have been unsuccessful in. Hopefully, I will find one soon before Christmas. The only issue I encountered was that the adhesive bling and rhinstones don’t have a very strong grip on the pumpkin; thus, they can potentially peel or fall off if you mess around with them too much.


I hope you enjoyed seeing some DIY Christmas/Frozen projects.

Thanks for reading!

Hally

Deco Mesh Wreaths!!

Lately, I have been in a wreath-making mood. I have seen some beautiful ones on Pinterest and wanted to try my hand at it. After watching a few YouTube videos on how to make deco mesh wreaths and gathering my supplies, I set out on making my first wreath….

And here is the result! (Click on image to enlarge)

LiGoDecoMeshWreathXmas LiGoDecoMeshWreathXmas5 LiGoDecoMeshWreathXmas4 LiGoDecoMeshWreathXmas2

I really, really enjoyed making it and loved how it turned out in the end. The results were a lot more pleasing than I expected. The biggest thing I learned is that when you are starting to adding the mesh, do NOT worry about how it looks at that exact moment. It will look better after you are done with the mesh and have time to fluff it up to your liking. Really, the entire process is all about “feeling” where things can go rather than approach it in a logical/organized way.

All my supplies were bought at Michaels, except for the red ribbon which I got at Joann last year.

1. Metal wreath frame that have the pipe cleaners already on there (or attach them yourself), a regular plain Christmas wreath (the one with branches of leaves that you will need to fluff out before adding mesh), or a regular metal wreath frames that have 2-3 rings.

2. 1 roll of Mesh (21″ x 3o yds) should be enough for an 18″ wreath base.

3. Two different designed WIRED ribbon with varying widths. The wire will help the ribbon pop off from the mesh

4. Christmas stems/picks, embellishments, signs, objects, etc

I’ll list a few videos below that I found useful.

I hope you feel inspired to start creating your own!

Hally

Butterfly Hiddnen Hinge Album

Hi, everyone!

Today, I wanted to do a bit of an update and show you a mini album I did a while ago. I saw a video about how to do a an album using the “hidden hinge” method (I’ll post the video below). It was new and interesting so I thought I would give it a whirl. It was a lot of fun to do, but, boy, was it time consuming! At least this project allowed me to use up a lot of my unused cardstock that was laying around.

The part where I had the most fun was decorating the front cover. This was my first experience putting together dimensional components so I had no idea how to make it “look good.” I bought a few things and hoped they would look today.

The flowers and “vines” were from the seasonal Fall selection at Michael’s. I bought the butterfly die (by Marianne Design -LR0115) online at Joann.com. I found that the die had to go through my Cuttlebug 3-4 times before it fully cut through the cardstock. It is a bit annoying, but the result is very nice. I recommend cutting two butterflies out and adhering them together for further stability because my one layer felt a bit flimsy.

I also dipped my toe in charm making. I am horrible at deciding what colors and gems go together, but at least I know now how to make a basic charm! It was fun, but definitely something I should hold off on since it is just as expensive as scrapbooking, if not more.

Photo: Found the perfect "branches" to add to the album!

Here are some other charms I made. Aren’t the “made with love” charms adorable?!! You can buy the tag charms inexpensively at Hobby Lobby in a pack. Everything else I bought at Michael’s.

butterfly charms

Here is the video:

Thanks for reading!

Hally

————————————————————————————————————————

Marianne Designs Creatables Die Butterfly 3, , hi-res

Disney Layout #3

Hi, everyone!!

Today I will show you my 3rd Disney layout. This one was so much fun to do!

03AResized Disney Scrapbook
I found this AMAZING collection by Simple Stories that goes perfectly with Disney-themed layouts. It is the “Say Cheese” collection and is available at Scrapbook.com, Joann, and Michael’s recently started carrying them in their stores. I only used one embellishment (the “Say Cheese” bubble at the top left corner) on this layout, but I will be using more of the collection in future scrapbook pages.

Moreover, I found a pack of large Alphabet letters at Michael’s that were on clearance and knew that they would be perfect for doing titles. The “body” of the letters is clear plastic (refer to photo below). I overlapped them using micro glue dots so that the actual letters were closer together. The “Hello” and “Cute” are wood veneers (also from Michael’s). I decided that I didn’t want the wood look so I tried using a white, silvery Ranger liquid pearls to turn it white. Once it dried, I put a layer of glossy accents to protect it. The wood felt fragile to me so I thought using white paint might deteriorate it.

04 Disney Scrapbook

The absolutely adorable”Mickey Poses” pattern paper is from Joann. The green with white dots paper is available at Michael’s. Joann actually has a pretty good selection of Disney-themed paper, unlike Michael’s which only has 1 or 2. The camera dimensional sticker is by Recollections and comes in a pack of 6 different looking cameras (#308573). The star and heart gemstones can be bought at any craft stores in the sticker section. I believe I got mine at Michael’s a long time ago. The mickey mouse gem sticker (picture above) comes in a pack of 18 of 3 different colors: red, clear, and black.

05 Disney Scrapbook

If you are interested in the “Disneyland 2014″ card (seen on the left side of the layout), you can find more Disney journal cards like it here. The cards in there are amazing and great for pocket page scrapbooking! The album is very large, so set aside a large window of time (1-2 hours) to look at them and download the ones you like. I would like to thank the creator of these Disney journal filler cards, pixiesprite, for making them. I have used many of her Disney cards in this scrapbook for journaling.

06 Disney Scrapbook

If you have any questions, please feel free to comment below or email me (refer to “Contact Me” tab above).

Thanks for reading!

Hally

————————————————————————————————————————-

SayCheeseChipboardStickers      MickeyGemStickers